Static vs dynamic linking usually has to do with our tolerance for the size of our final executable. A static executable contains all code necessary to run the executable, so the operating system loads the executable into memory, and it’s off to the races. However, if we keep duplicating code over and over again, such as printf, then it starts to use up more and more space. So, a dynamic executable means that we only store stubs in the executable. Whenever we want to access printf, it goes out to a dynamic linker and loads the code essentially on demand. So, we sacrifice a tiny bit of speed for a much smaller executable.
Contents
- What is Linking
- Finding Symbols
- Static Libraries (archives)
- Dynamic Libraries (shared objects)
- Analyzing a Shared Program
- Unresolved Symbols at Run Time
- Procedure Linkage Table (plt)
- Global Offset Table (got)
- Loading and Updating the GOT
- Conclusion and Further Reading
- Video
What is Linking?
When I hear someone talk about compiling their program into an executable, they are really eliding over several stages. The definition of compiling is to produce something by combining information collected from different sources. In computing, we generally think of compiling as turning a higher-level language, such as C, into a lower-level code, such as assembly.
The final stage before we get an executable is the linking stage. This is where we link (hence the name) all sources together to produce one coherent executable. This is also where all outstanding symbols need to be resolved. Symbol is just fancy for the name of a function or global variable.
We can take a look at object code, which is what we get after we assemble but before we link. Here’s an object dump of an example program.
#include <stdio.h>
#include <stdlib.h>
void some_func(int a, int b);

int main(int argc, char *argv[]) {
	if (argc < 3) {
		printf("Not enough arguments.\n");
		return -1;
	}

	int a = atoi(argv[1]);
	int b = atoi(argv[2]);

	some_func(a, b);

	return 0;
}
This code produces the following object code, which I disassemble using objdump for RISC-V.
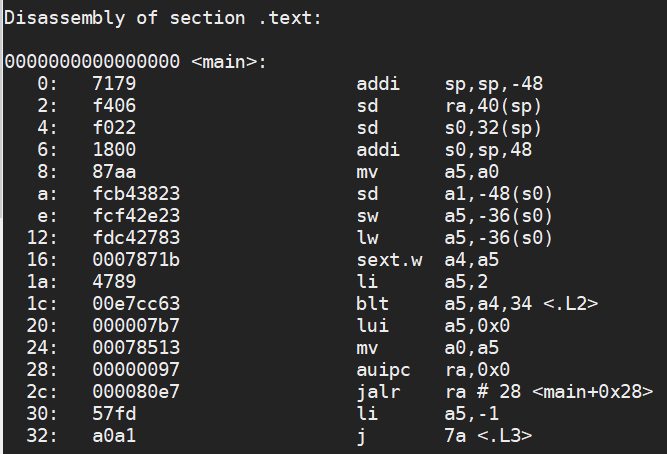
Notice that the function some_func has been prototyped, but has not been defined. This will be the responsibility of the linker to find the symbol some_func and add it into our program. Notice what happens when I try to link this program without ever defining some_func.
/opt/riscv_1/lib/gcc/riscv64-unknown-linux-gnu/9.2.0/../../../../riscv64-unknown-linux-gnu/bin/ld: /tmp/ccmgFc75.o:


in function .L2': test.c:(.text+0x62): undefined reference to some_func'


collect2: error: ld returned 1 exit status
The linker is looking for the symbol some_func, but it cannot find it, so we get an undefined reference. We know this is at the linker stage because the error is “ld returned 1 exit status”. The “ld” means “linker”.
We also can see that the address of the function main is 0, this is because we haven’t linked a program. So, our object code just contains bubbles of code, which will then be placed into our executable at certain locations by the linker.
Finding Symbols
If we use the command nm, which is used to list symbols in an object file, we can see all of the unresolved symbols. Our object code is looking for these, but it doesn’t need to know where they are until we have a full executable program.
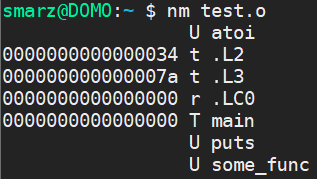
You can see that in this object file, the linker has a little bit of work to do. It must find atoi, puts, and some_func, which are flagged as U for undefined symbols. When we execute the linker, we will specify certain libraries, such as -lc (the C library), which most of these symbols will be found. Our some_func has never been defined, so our linker cannot really succeed until we define it somewhere.
Static Libraries (archives)
Archive files generally end in .a and contain code and other information that will be added to the final executable. Essentially, archive files are just a collection of object files into one file. Therefore, when we link to an archive file, we extract the actual code from the object code into our executable. The nice thing about archive files is that we don’t need to add ALL symbols into our executable–we only need those symbols that need to be used.
Usually, we have archive versions of all libraries to allow for static executables. These executables are those that don’t need any additional loading to run. In other words, these are self-contained files. The linker stage will pull in the code directly from the .a file into the executable, and all is done. The more code that the linker pulls in, the larger the executable will be.
Let’s go ahead and define some_func and see how linking works.
#include <stdio.h>

void some_func(int a, int b)
{
	printf("Data = %d\n", a * b);
}
It’s very simple, but the point is to have some code that the linker can pull in. Recall that the linker gave us an “undefined reference” error because we didn’t define some_func. Now, we have it defined, so let’s see what happens.
riscv64-unknown-linux-gnu-gcc -static -o test test2.o test.o
Notice that I’m using gcc still. This will automatically invoke the linker and pull in the necessary start files. If we invoke the linker directly, we have to define _start and tell the program how to start, or we would have to directly specify the start files.
I specify -static so that gcc will pull in only .a files. When we are done, the file test will be a fully-contained, static executable. If we take a look at this file, we can see that all of the “stuff” we need for this executable makes it a fairly large file.
-rwxr-xr-x 1 smarz smarz 4687920 Jun 1 09:16 test
Yes, that’s 4,687,920 bytes or about 4.7 megabytes. However, if we looked at the symbol table, we will find that NO symbol is unresolved, and therefore this is a self contained executable. If we load this with our elf loader, no external resources will need to be pulled in.
Our linker must exhaustively follow every possible route and pull in those symbols even though they may never be called. We can see the symbol table is enormous due to all of the calls and global variable (such as errno).
00000000000101b0 T abort
000000000006bb38 S __abort_msg
0000000000029aa8 t add_alias2.isra.0.part.0
00000000000497c6 t add_fdes
00000000000297ea t add_module.isra.0
000000000003aa4e t add_name_to_object.isra.0
000000000003ab5c t add_path.isra.0.constprop.0
000000000006b8d0 d adds.8114
000000000002fe2e T __add_to_environ
00000000000431b6 t add_to_global
000000000001adb4 t adjust_wide_data
000000000006bba0 V __after_morecore_hook
0000000000012d3a t alias_compare
000000000002338a W aligned_alloc
000000000006bb80 s aligned_heap_area
000000000003ff04 t allocate_dtv
000000000003a40c T __alloc_dir
000000000006ca38 b any_objects_regis
Dynamic Libraries (shared objects)
Dynamic libraries end in .so, which stands for shared object. These libraries contain code that will not be added directly into the executable. Instead a program called the dynamic linker will be responsible for taking code from the .so files and adding them into an executing program. We can also add symbols ourselves using the -ldl (dynamic linker) library.
We can think of the term dynamic as run-time. That is, we don’t actually load the code into our program until the program actually runs. We can see this with something as simple as printf. We can examine our executable and we don’t see printf’s code. Instead, we see printf’s stub. This stub will then be replaced by the dynamic loader when the program executes.
When we link with a dynamic, shared object, those symbols that can be added at run time will remain unresolved. We will have the symbols’ names put into a table just so we know it’s out there somewhere. However, with shared objects, we now can get that unresolved reference (or symbol) at run-time! If you have arch-linux and have ever compiled anything yourself, you might’ve run into this phenomenon.
Making a Shared Library
Let’s go ahead and turn our test2 file into a shared object. This is fairly easy to do with gcc:
riscv64-unknown-linux-gcc -fPIC -shared -o libtest2.so test2.o
The switch -fPIC stands for position independent code. That means all offsets cannot be relative outside of the library itself, and this is usually the case for most shared libraries. In this case, the generated code will be placed into a table to find the offsets. This is required since the library, or specific symbols in the library, can be loaded into any location by the dynamic linker.
Then, we can compile our test program to link to this shared library:
riscv64-unknown-linux-gcc -o test test.o -L. -ltest2
In the command above, I am specify the library search path with -L, so -L. means to look in the current directory. Then, I specify the library to link with using -ltest2. GCC will automatically prepend lib and append .so to make libtest2.so.
Analyzing A Shared Program
First, we compile in the location of our library. We can see these shared libraries using the ldd command.
smarz@DOMO:~ $ ./test

./test: error while loading shared libraries: libtest2.so: cannot open shared object file: No such file or directory
So, when I run my program, it looks at a certain path to find your libraries. This is analogous to the PATH environment variable, except in Linux (and some UNIXes), we use LD_LIBRARY_PATH. Shown below, if I change my path so the dynamic linker can find my library, it functions properly:
smarz@DOMO:~ $ LD_LIBRARY_PATH=/home/smarz ./test 10 20

Data = 200
Unresolved at Run Time
When we link a program, many of the symbols will remain unresolved. This tells us what symbols the dynamic linker is responsible for loading from the shared objects (libraries). We can see these unresolved symbols using the nm command:
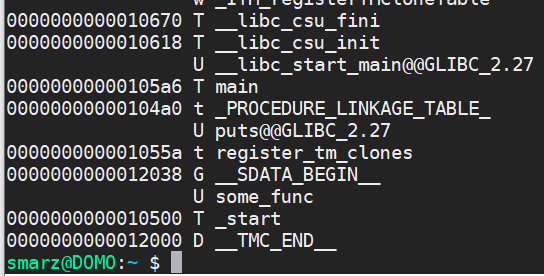
You can see that puts is unresolved (capital U letter), and so is some_func, since we now put it in a shared library. These symbols have stubs that will eventually invoke the interpreter to load the actual code for that function.
The dynamic linker’s job is to resolve these symbols when we approach them. In fact, we can take a look at the produced ELF executable to see what it wants to use to resolve symbols.
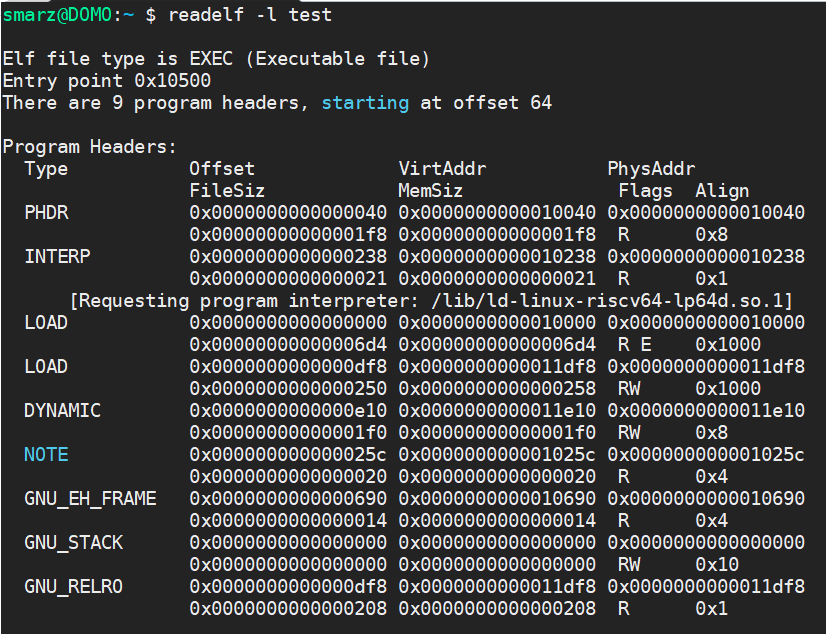
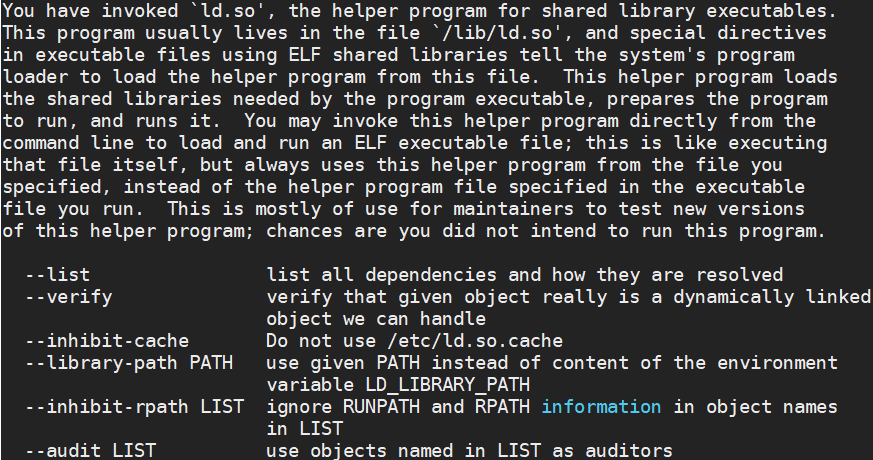
You can see the INTERP section (interpreter), which requests the dynamic linker by name. If we run this dynamic linker, we can see its purpose.
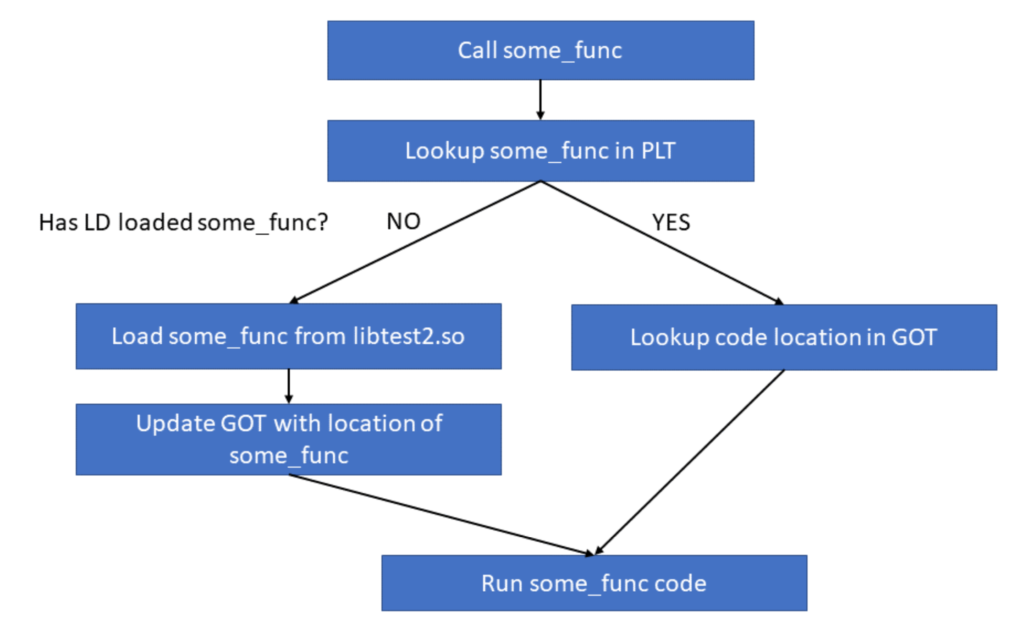
To resolve these symbols, the linker will put in a loader in place of the actual function. When we run our program, some_func’s assembly instructions are no where to be found in our program. Instead, when we make a function call to some_func, it will refer us to the procedure linkage table (PLT). The procedure linkage table will then lookup where the program is loaded by referring to the global offset table (GOT). At first, the address in the GOT is the code that loads the program (the dynamic linker). After the dynamic linker loads our some_func code, it changes the GOT to reflect where it put some_func in memory.
Procedure Linkage Table (PLT)
If we take a look at the functions and other symbols we’re going to use in our program, we notice that they’re very, very short, and they look almost identical to each other. This is because we have a stub, which loads the program from the procedure linkage table, PLT.
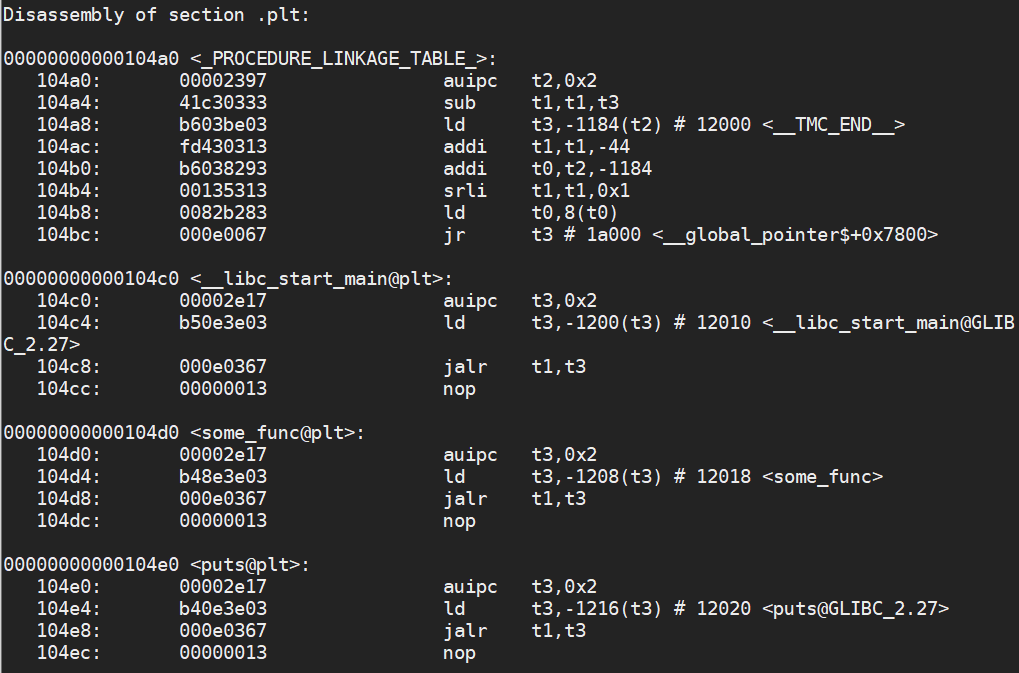
Our some_func loads from -1028(t3) and jumps to that location. The value of t3 is the global offset table (GOT), which I cover below. We can see that -1028(t3) is the address 12018, which is right in the meat of the GOT.
So, we go to the function, which then loads from the global offset table, which then points us to the procedure linkage table. In this procedure linkage table, if the procedure has been used before, the code for that procedure, such as puts or some_func, will be loaded into the table. Otherwise, it will be a stub function whose job it is to invoke the interpreter and load the code.
Global Offset Table (GOT)
The global offset table is a large table that contains offsets that we can load from. Here is the table in our test program.
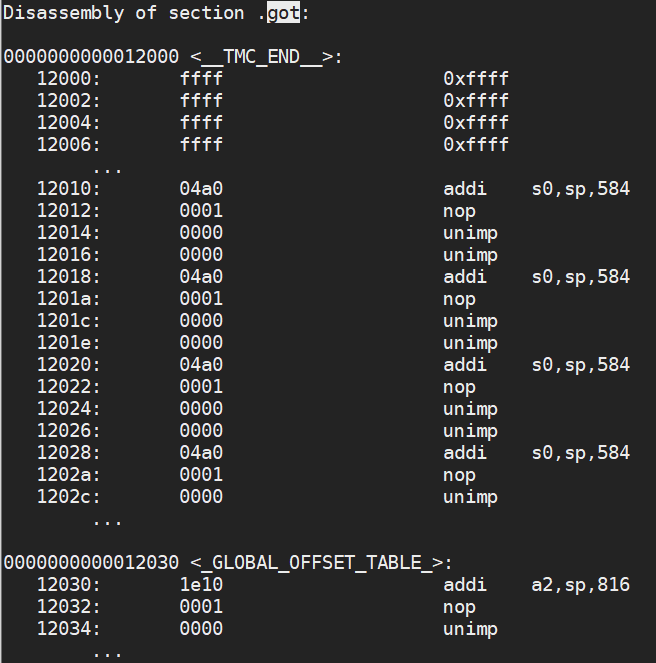
Don’t worry about the assembly instructions–these aren’t instructions, but objdump is trying to disassemble them anyway.
Loading and Updating the GOT
Notice that all functions originally point to 0x0000_0000_0001_04a0, which goes back to the procedure linkage table. This is where the interpreter routine is located which loads the symbols. When the symbol is loaded by the interpreter, it will modify the global offset table to reflect where it loaded it into memory. We can look at this by directly referencing the memory being used.
Let’s modify our program to see what we get here:
#include <stdio.h>
#include <stdlib.h>
void some_func(int a, int b);

int main(int argc, char *argv[]) {
	if (argc < 3) {
		printf("Not enough arguments.\n");
		return -1;
	}

	int a = atoi(argv[1]);
	int b = atoi(argv[2]);
	volatile unsigned long *ptr = (unsigned long *)0x12018;

	printf("0x%016lx = 0x%016lx\n", ptr, *ptr);

	some_func(a, b);

	printf("0x%016lx = 0x%016lx (some_func is at 0x%016lx)\n", ptr, *ptr, some_func);

	return 0;
}
In our modified program, we look at 0x12018, which was where our some_func stub was located in the global offset table (remember some_func@plt referred us to this location in the GOT).
Notice that at first the global offset table points to 0x104e0, which is the code used to invoke the interpreter which in turn loads the symbols. Notice that when we load some_func, the global offset table has been updated with the memory address 0x400_0081_b460. This is where our dynamic linker loaded the code for our some_func function.

Since I updated the function, some of the offsets are no longer what they were for our original program. However, to show you that the some_func function itself points to the procedure linkage table, let’s take a look at the updated object dump:
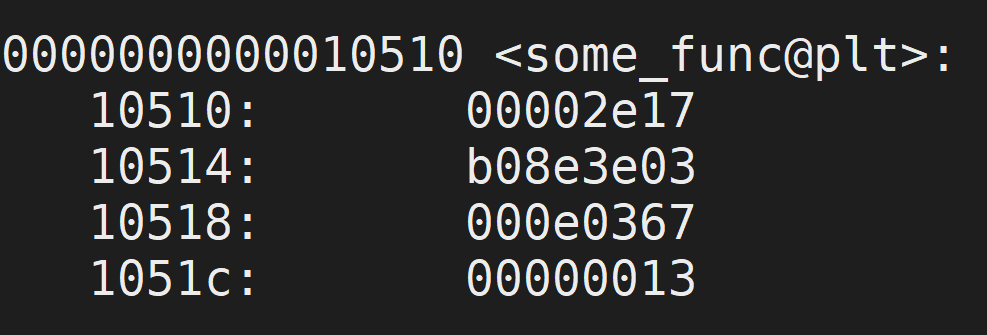
When I print out some_func’s memory address, we get 0x10510, which is where it is located in the procedure linkage table. However, if we look at the table, notice that it grabs the address of the actual function from the global offset table. In this case, the stub is at 0x104e0. After some_func is loaded (after its first invocation), the global offset table is updated to reflect 0x400081b460, which is where the actual assembly instructions are located for some_func.
Conclusion
If we break down what’s happening here, there is no magic happening. For dynamic symbols, we just have a table that stores their addresses. The table’s location is fixed, so we can compile that directly into our program. However, what the table refers to is dynamic, so it can be updated by the dynamic linker ld.so with wherever it put our code. That’s it!