Up until now, we’ve only been using the integer instructions. However, now that we want to support user processes, we must be able to support the hardware floating-point unit (FPU). In RISC-V, this is fairly simple, but it can lead to some trouble if we’re not careful.
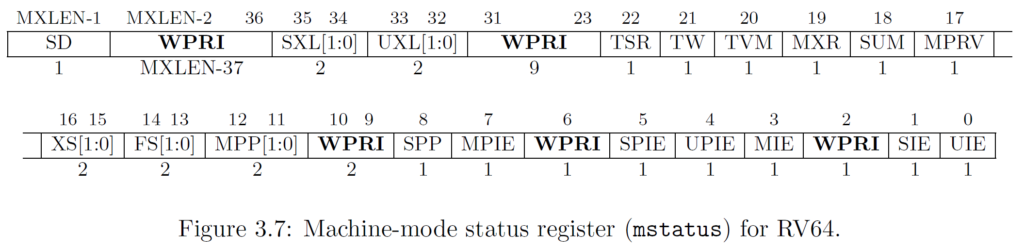
First, the floating-point unit must be controlled through the mstatus register–more specifically the FS bits (bits 14 and 13).
Recall that we used this register to change processor modes (MPP). However, now we care about this register to control the floating point unit. These two bits support four different states of the floating point unit:
FS[1:0]
Description
00
FPU off.
01
FPU on, initial state.
10
FPU on, no register changes since FPU was reset.
11
FPU on, some registers have changed since FPU was reset.
If we try to load or store (fld or fsd) a floating point register while the FPU is off, it will trap to the operating system. So, we need to make sure we have the floating point unit turned on and ready to go before we do any work with it. We can add a bit in the switch_to_user function we wrote to turn on the FPU into the initial state whenever we context switch to another process.
The first thing we do is tack on 1 << 13, which sets the FS bits to 01, which is the initial state. Unlike MPP (machine previous privilege), this immediately takes effect. Then, we restore the registers from the TrapFrame structure. Conveniently, this follows the 32 general purpose, integer registers. You can see our macro load_fp gets expanded to the following:
.altmacro
.set NUM_GP_REGS, 32  # Number of registers per context
.set REG_SIZE, 8   # Register size (in bytes)
.macro load_fp i, basereg=t6
	fld	f\i, ((NUM_GP_REGS+(\i))*REG_SIZE)(\basereg)
.endm
We skip \(8\times 32=256\) bytes to get through all 32 of the GP registers. Now we’re at the register we want. Just like ld loads a memory location into a general purpose register, fld will load a memory location into a floating point register. REMEMEBER: the FPU must be turned on (\(\text{FS}\neq 0\)) at this point via the FS bits.
Restore or Save?
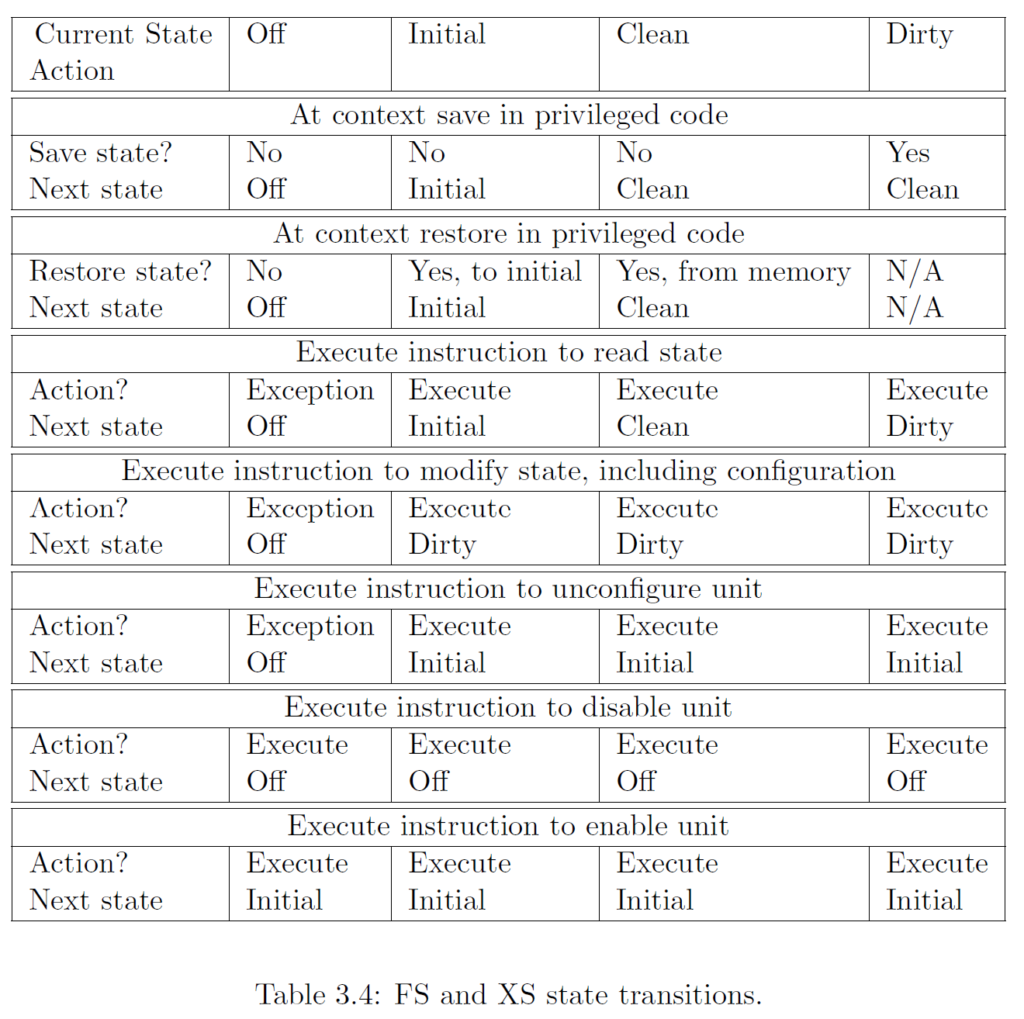
We use the FS bits to not only control the FPU, but to also see what happened. The RISC-V privileged specification recommends the following for the FPU during traps:
Handling Traps
The reason the floating-point unit has more than an on/off state is because it allows us to only save the registers if they’ve changed. If the user process never even used the FPU, why save those registers? However, the granularity of the floating point unit is such that if only 1 of the 32 registers changes, we have to save all 32 of them.
So, we need to add code that checks the state of the FPU to see if we need to save the registers. We can do this by reading the FS bit:
Above, we read the mstatus register, shift it right 13 places and mask it with 3, which is binary 11. This means we isolate the FS bits (2 bits) so we can read what the value is. If these two bits are NOT 11 (recall this means the registers were written to), then we skip saving the floating point registers and jump to the numeric label 1 forward (hence 1f).
To look at the TrapFrame structure, we see the following in Rust (cpu.rs):
Our fregs (floating-point registers) follow the 32 general purpose registers. So, the only math we need to do is \(8\times 32=256\).
This is really it! We can use the floating point unit in the kernel, provided we turn it on before we use any of the registers. Again, if we try to use the FPU while the FS bits are 00, we will get a trap.
We wrote the code in our Minix 3 file system to read an inode and then read the direct, indirect, doubly-indirect, and triply-indirect pointers that point to the data relevant to the given inode. However, we were required to do a stat in order to see what inode we needed to get. Obviously, this isn’t how file systems actually work. Instead, we want to search for a given inode by its name.
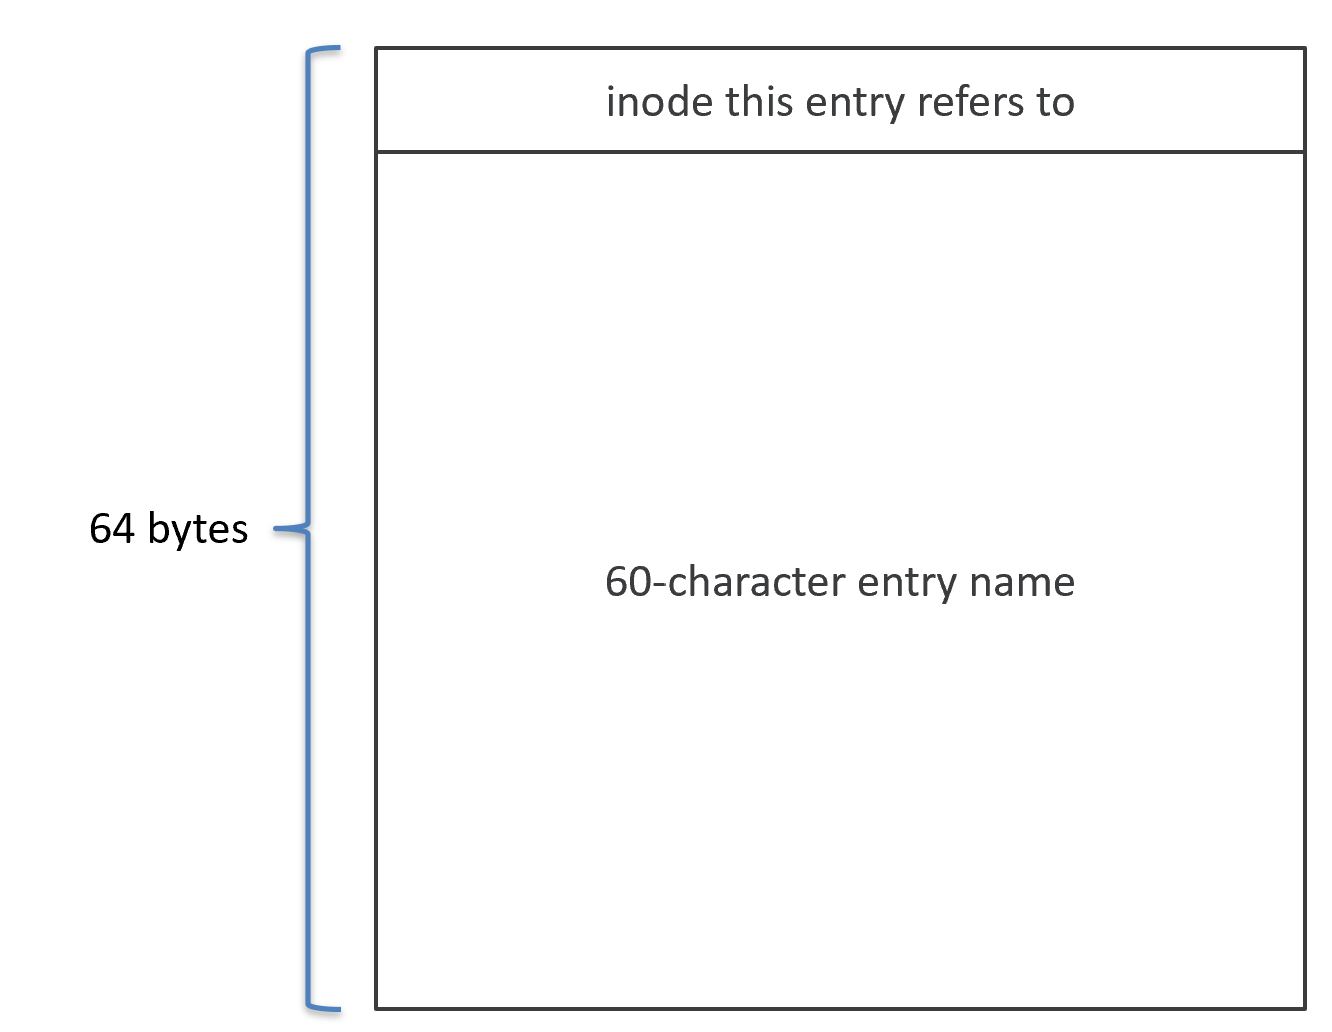
Recall that in Minix 3, we have a directory entry structure, which in Rust looks as follows.
The code above shows that we have a 4-byte inode and a 60-byte name. This is how we link a name to an inode. In fact, we can have multiple names link to the same inode–these would be called hard links. This is also why we don’t have a delete filesystem function. Instead, it is called unlink. When we unlink, we break a name to inode linkage. Whenever there are no more links left, the file is considered deleted.
Where do we find these DirEntry structures? That’s fairly simple. Recall that whenever we read a file, we go to the 10 “zone” pointers. For a regular file, when we go to the ends of each pointer, we find the actual data that belongs to the file. However, if the file in question is a directory, which we would know by looking at the inode’s mode, then these pointers point to a bunch of DirEntry structures.
For a block size of 1,024 bytes, we have \(1,024 / 64 = 16\) total DirEntries per block. Recall that we have a 4-byte inode and a 60-byte name, which is why each structure takes 64 bytes.
Another issue we run into is searching the directory entries. This is a very expensive task since we only get 16 entries per block. Therefore, we need to cache the inodes. In other words, we need to put something in memory to make look-ups quicker. Fortunately, this is fairly straightforward to do.
Our game plan is to look for all directory entries in the file system and store them in a some format where lookups are quick. We don’t really care about insertion or deletion times, but we will be doing a ton of lookups. So, let’s add some code to cache inodes. We will start whenever we initialize a file system. We are given the block device that backs the file system. This way here, we can use our virtio block driver to read and write to it.
We don’t quite have a virtual filesystem yet, so we’re doing much like a DOS based allocation system. So, essentially we are blockdevice:, such as 8: (remember in DOS, we had C:?). Then, whenever we get into that block device, we have our underlying file system. Currently, we cannot just mount one file system into the directory structure of another. However, with a VFS, we would have a single map that stores the entire file system. Instead of mapping strings to Inodes, we would need to map strings to some sort of structure that told us what block device to go to and then the Inode or some identifying value.
Notice that I’m using the BTreeMap here. This is built-in to Rust’s alloc::collections library, which then hooks to the global allocator we wrote a loooooooong time ago.
We will be storing the entries by path–this is our key. Then, we will store the Inode of that entry as the value. This should give us all the information we need.
So, now we need a game plan to actually cache the inodes. First, we need to know the directory structure. Recall that in Minix 3, we only know the name of the given file in the DirEntry structure. We don’t know the full path, so that’s something we will need to keep up with ourselves. So, here’s our init() function in Rust.
pub fn init(bdev: usize) {
	if unsafe { MFS_INODE_CACHE[bdev - 1].is_none() } {
		let mut btm = BTreeMap::new();
		let cwd = String::from("/");
		// Let's look at the root (inode #1)
		Self::cache_at(&mut btm, &cwd, 1, bdev);
		unsafe {
			MFS_INODE_CACHE[bdev - 1] = Some(btm);
		}
	}
	else {
		println!(
		         "KERNEL: Initialized an already initialized \
		          filesystem {}",
		         bdev
		);
	}
}
As you can see above, we allocate a string (String::from(“/”)), which is the root directory. Then, we look at each directory entry in the root. If we hit yet another directory, we recursively do the same thing until there are no more directories. So, our cache will store both directories and regular files–their paths and inodes, not the actual data.
As a side note, Rust requires that we add unsafe {} because this is a mutable static variable, meaning that it is global and can be changed, hence, it is not thread-safe unless we added locking.
So, let’s take a look at the function that actually does the work. This is the Self::cache_at function that you see above.
fn cache_at(btm: &mut BTreeMap<String, Inode>, cwd: &String, inode_num: u32, bdev: usize) {
   let ino = Self::get_inode(bdev, inode_num).unwrap();
   let mut buf = Buffer::new(((ino.size + BLOCK_SIZE - 1) & !BLOCK_SIZE) as usize);
   let dirents = buf.get() as *const DirEntry;
   let sz = Self::read(bdev, &ino, buf.get_mut(), BLOCK_SIZE, 0);
   let num_dirents = sz as usize / size_of::<DirEntry>();
   // We start at 2 because the first two entries are . and ..
   for i in 2..num_dirents {
      unsafe {
         let ref d = *dirents.add(i);
         let d_ino = Self::get_inode(bdev, d.inode).unwrap();
         let mut new_cwd = String::with_capacity(120);
         for i in cwd.bytes() {
            new_cwd.push(i as char);
         }
         // Add a directory separator between this inode and the next.
         // If we're the root (inode 1), we don't want to double up the
         // frontslash, so only do it for non-roots.
         if inode_num != 1 {
            new_cwd.push('/');
         }
         for i in 0..60 {
            if d.name[i] == 0 {
               break;
            }
            new_cwd.push(d.name[i] as char);
         }
         new_cwd.shrink_to_fit();
         if d_ino.mode & S_IFDIR != 0 {
            // This is a directory, cache these. This is a recursive call, which I don't really like.
            Self::cache_at(btm, &new_cwd, d.inode, bdev);
         }
         else {
            btm.insert(new_cwd, d_ino);
         }
      }
   }
}
What we do here is look at the inode that we’re initially given, which remember the root is number 1. We first read the given inode–the given inode should be a directory’s inode since we don’t call cache_at on regular files. Recall that each one of these inodes has blocks filled with the DirEntry structure (64 bytes).
If we find a directory, we recursively call cache_at with the new inode and new path. That will again search through all of the directory entries, and if there are any more directories, it will yet again recursively look through all of them. Otherwise, if we find a file, we just store the path, and we don’t recurse.
Pay no mind to me trying to figure out how to make Rust consider character arrays (u8 arrays more accurately) as strings. So, instead, I had to make a string and go character-by-character pushing each character from the array onto the string.
Using The Cache
Now that we’ve cached the inodes, it’s time to make it do something. Luckily, since BTreeMap is built-in to Rust, we can just use its .get() member function. If this function finds the key, it will return a Some(Inode). Otherwise, it will return None. We can use this to see if the file exists or not. So, let’s add some code to our open() filesystem function.
pub fn open(bdev: usize, path: &str) -> Result<Inode, FsError> {
   if let Some(cache) = unsafe { MFS_INODE_CACHE[bdev - 1].take() }
   {
      let ret;
      if let Some(inode) = cache.get(path) {
         ret = Ok(*inode);
      }
      else {
         ret = Err(FsError::FileNotFound);
      }
      unsafe {
         MFS_INODE_CACHE[bdev - 1].replace(cache);
      }
      ret
   }
   else {
      Err(FsError::FileNotFound)
   }
}
All we do here is grab exclusive access to the cache, look for the provided path, and then give back access to the cache. If we found the Inode, we copy it and return it wrapped in an Ok(). Otherwise, we wrap the cause of the error in an Err(). Notice I returned FileNotFound if we couldn’t get access to the cache. Perhaps this makes FNF ambiguous.
Now, to initialize our cache, we run init() in a process context. Then, we can grab the inode by using open(). Finally, if we want to read the data in it, we can use read(). Notice that the read() fs function has changed to accept an Inode reference. This helps keep things a little bit cleaner. This also gives us a flow: we cache inodes, we open a file to get its Inode structure, we read based on this Inode structure. For now, close doesn’t do anything because there is nothing really to close. For reads, we don’t care. For writes, the close would do something, such as make sure all writes have completed.
If you are living under a rock, quarantined against COVID-19, here’s quite a long, and somewhat technical, post for your consumption. This post will talk about how C and assembly dance together–the tango? waltz? who knows?
I usually write about operating systems, but I have not been able to write an operating system completely in one language. It probably can be done, but for me I write the bootloader and some utilities purely in assembly.
I will be using the RISC-V architecture to describe how C translates into assembly. The nice thing about C is that there are only a fair amount of abstractions, so we can take a statement of C and translate it into assembly.
I teach my students to develop their logic in a higher-level language (mainly C++) and then translate into assembly. Assembly requires you to keep several things in your head at once, even to write a simple for loop. Luckily, there are some macros in assembly to make it a bit easier.
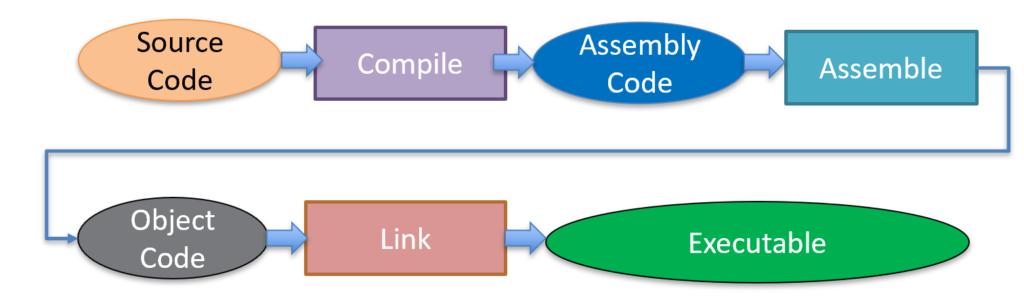
Let’s not forget that when we compile C code, we get assembly files. You can see the intermediate assembly file by using the -S switch to gcc. Otherwise, gcc will typically put the assembly file in the /tmp/ directory.
gcc -S test.c
Technically, C doesn’t have to compile into assembly, but as far as I know, nearly all compile into some lower-level language, and not directly into machine code (object code).
So, to get code into machine instructions, we have to follow the steps below:
An executable is a special type of machine code. Executables are usually in a specific format that the operating system can understand. However, inside of the executable is a section called the text section. This is where the machine code is stored. In Linux, this is called an executable and linkable format or ELF file. In Windows, this is called a portable executable or PE.
Why Assembly?
Assembly has many additional abstractions on top of it, including macros, labels, and pseudo-instructions. Yes, that’s right, assembly will do many things for you. However, the nice thing about assembly is that one instruction more-or-less is really one instruction (except maybe with pseudo-instructions). That is, we don’t let any compiler tell us how it wants to do things. If we want to make the addition operator (+) preferred over the multiplication operator (*), we can do it. Why would we do that? Uhh.. Ask someone else.
Another reason we use assembly over a high-level language is to use instructions that C or C++ cannot really use. For example, the advanced vector extensions (AVX) for an Intel processor don’t have a 1-to-1 conversion from C. Now, many compilers have done some work with this using what are known as intrinsics. (EDITED): These instrinsics are assembly wrappers on top of C. So, we can’t get by with C doing the hard part for us. Where as int i = 10 * z; will produce the assembly we need to get the result, the intrinsics are C-syntax for assembly instructions. So, all in all, we still need to know what the assembly is doing.
An optimizing compiler might be able to make some improvements with the assembly, but let’s take a look at two different ways to do matrix multiplication using SSE in Intel. One, we use the intrinsic instructions in C and in the other, we use assembly directly.
The code above multiplies a 4×4 matrix with a 4 element vector. However, if you look at how to multiply matrix by a vector, you see that we can parallelize each row, which is what I’m doing up here. So, first, we loadu (load unaligned) using ps, which stands for packed single. This means that it will grab 4, 32-bit floats and put them into a single 128-bit register. Then we multiply the matrix row with the vector. That’ll give us 4 elements all multiplied together. Then, we need to add all four elements together to get a single value, which is the result of the vector at that element. Each haddps instruction adds two elements together. To get all four elements added, we run the instruction twice.
You can see that in C, this looks fairly easy to do, but we still need knowledge of what the instruction is doing. If I write the assembly, as below, I can group certain operations and use the larger register set to my advantage. See below.
Either way you slice it, we’re writing assembly either in a .S file or as the intrinsics, such as _mm_haddps.
C Calling Conventions
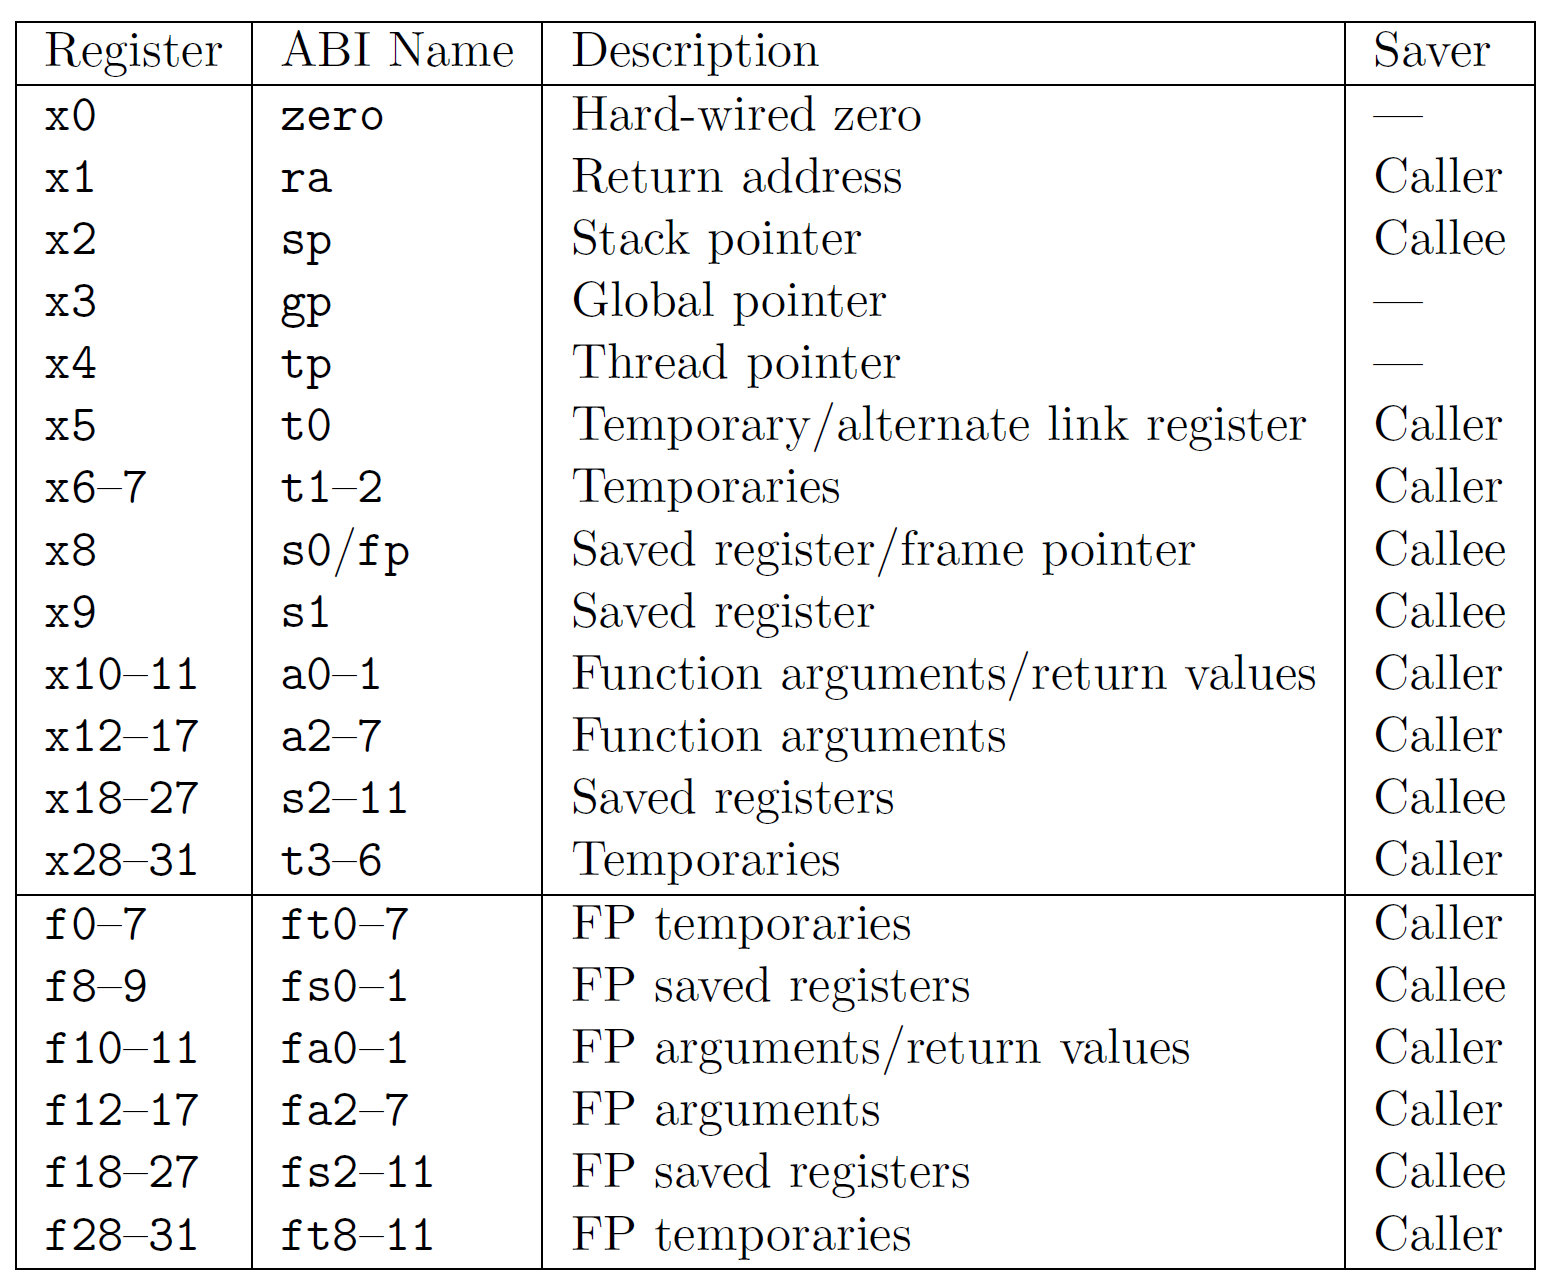
C has a standard for most architectures called the ABI, which stands for application binary interface. We use this standard so that any language can talk to another, as well as the architecture, provided they use the standard. Some things about the C calling conventions include what registers get what values whenever we call a function. Furthermore, it specifies which registers can be destroyed by the called function and which must be preserved. In RISC-V, the actual RISC-V specification has an Assembly Programmer section, which defines the following for the registers.
You can see that the registers have two names, one that starts with x and the other that starts with a, s, t, and some others. These are referring to the same registers, but x just gives you a number for that register. The a stands for argument, the t stands for temporary, and the s stands for saved. These are called ABI names for the registers, and then the description tells you what the ABI recommends each register should do. Finally, notice that there is a column called Saver. Again, we have to know which registers we’re responsible for.
Register Sizes
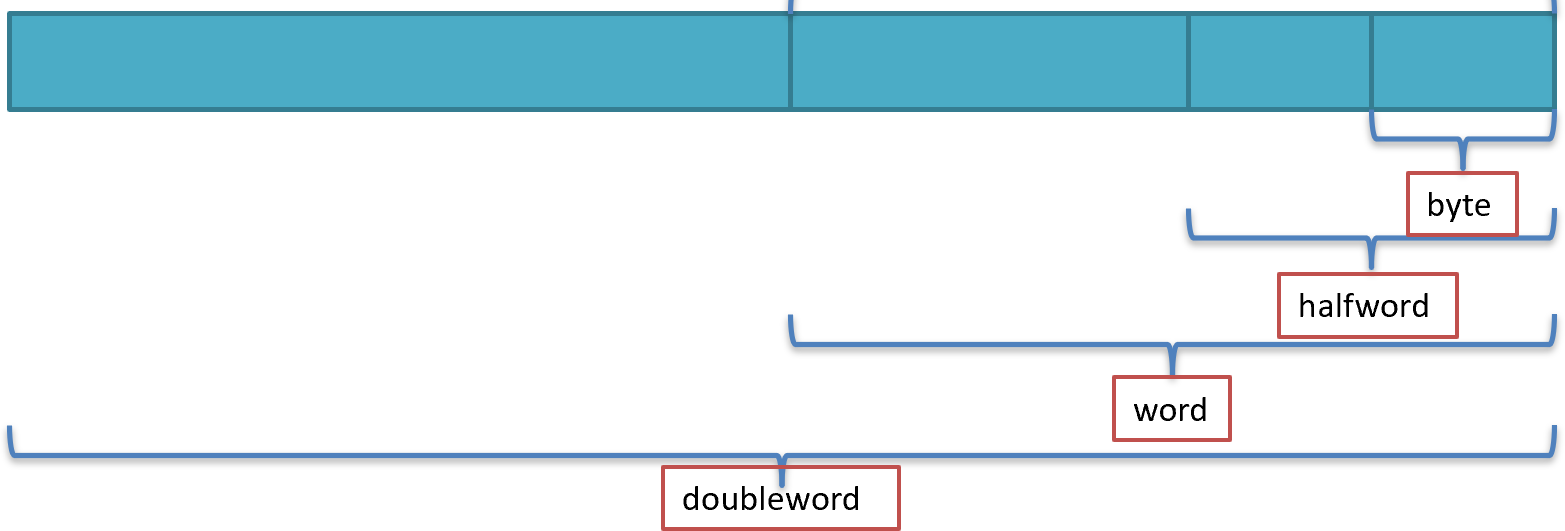
The load and store instructions can have one of four suffixes: b, h, w, or d, which stands for byte, halfword, word, and doubleword, respectively. A word in RISC-V is 32 bits or 4 bytes.
Each register in RISC-V is either 32 bits (for RV32) or 64 bits (for RV64). So, even though we load a byte from memory, it is still being stored into a bigger register. With the vanilla load and store instructions, the value will sign-extend from 8 bits to 64 bits.
Caller vs Callee Saved
Saving registers is important because we call both scanf and printf. A callersaved register means that when we call scanf and printf, we are NOT guaranteed that the value we put in that register is the same as when the function returns. Most argument and temporary registers follow this convention.
A callee-saved register means that when we call scanf and printf, we are guaranteed that the value we put in these registers is the same when scanf and printf return. This means that scanf and printf are allowed to use the saved registers, but they are required to restore their old values before they return.
Generally, all argument and temporary registers are free to be destroyed by a function, but all saved registers must be saved. For all of this to work, C must be aware of what to do with these registers.
C and Assembly Code
When I teach my students how to encode (from assembly to machine) and decode (from machine to assembly) instructions, it is easy to see that each instruction encodes into exactly 32-bits in RISC-V (not counting the compressed instructions). However, I’m not exactly sure how I would teach that using C. Let’s take a simple C program and see how it would translate into RISC-V assembly.
#include <stdio.h>
int main() {
   int i;
   scanf("%d", &i);
   printf("You gave %d\n", i);
   return 0;
}
This translates into RISC-V assembly as:
.section .rodata
scanf_string: .asciz "%d"
printf_string: .asciz "You gave %d\n"

.section .text
.global main
main:
   addi sp, sp, -16
   sd ra, 0(sp)
   la a0, scanf_string
   add a1, sp, 8
   call scanf
   lw a1, 8(sp)
   la a0, printf_string
   call printf
   ld ra, 0(sp)
   addi sp, sp, 16
   jr ra # same as ret instruction
The code above produces the following output. I gave 100 as an input for scanf:
First, in C, all strings are read-only global constants. The directive .asciz above means that we have an ASCII-table string with a zero on the end of it. This is how C builds a string. So, C, knows the starting memory address and goes character-by-character until it hits a zero. So, in other words, C-style-strings are arrays of characters.
.section .rodata
scanf_string: .asciz "%d"
printf_string: .asciz "You gave %d\n"
So, the portion above labels these strings as scanf_string and printf_string. A label is just like a variable–it’s just a nice name for a memory location.
.section .text
.global main
main:
The .text section is also called the code section, and it is in this section we place CPU instructions. The directive .global main makes the label, main, viewable outside of this assembly file. This is necessary because the linker will look for main. Then, we have a label called main. You can see that a function is just simply a memory label where we can find the CPU instructions for that given function.
In C, every function must have a unique name. So, a C function’s name directly corresponds with the assembly’s memory label. In this case, main is the label for int main().
addi sp, sp, -16
sd ra, 0(sp)
The sp register stores the stack pointer. The stack is memory storage for local variables. Whenever we allocate memory from the stack, we decrement. Then, we own everything between what we decremented and the original value of the stack pointer. So, in the case above, main now owns sp – 16 through (but not including) sp. Again, sp is just a memory address.
The instruction sd stands for store-doubleword. In this case, a double word is 64 bits or 8 bytes. We are storing a register called ra which stands for return address. There is only one RA register, so whenever we call another function, such as scanf and printf, it will get overwritten. The purpose of this register is so printf and scanf can find their way back to main. Since these functions can be called from anywhere, it must have a return path…hence the return address.
la a0, scanf_string
add a1, sp, 8
call scanf
Before we make a function call, we have to make sure the registers are setup before we make the call. Luckily, RISC-V makes this easy. The first argument goes into register a0, the second into a1, and so forth. For scanf, the first argument is a pointer to a string. So, we use the la (load address) instruction, which is actually a pseudo-instruction, to load the address of scanf_string into the first argument register, a0.
The second parameter is &i in C, which is the memory address where we want to store what we scan. In this case, i is a local variable, so we store it on the stack. Since bytes 0, 1, 2, …, 7 are being taken by the RA register, the next available offset we have is 8. So, we can add sp + 8 to get the memory location where we can put the value we scan.
lw a1, 8(sp)
la a0, printf_string
call printf
The code above loads a word, which is 32 bits or 4 bytes, from sp + 8, which recall is where scanf scanned our integer. This goes into the second argument, a1. Then, we load the address of the printf_string and store that memory address into the register a0.
Pointers and References
What do pointers and references mean in assembly? In C, we know that a pointer is an 8 or 4-byte memory value that stores a memory address. So, it’s like inception where a memory address stores a memory address. In assembly, we get a memory address inside of our argument registers instead of a value. Here’s an example.
Notice that we store a0 into 8(sp). This is a memory location. So, when we ld a1, 8(sp) for the scanf call, a1 will be populated with the memory address that value points to, and hence, scanf will store the value inside of there. Notice that even though it is an integer pointer, we use ld and sd (doubleword). This is because we’re not storing the value, we’re storing the memory address, which on a 64-bit machine is always 64 bits (8 bytes).
To demonstrate pointers, lets do something simple, except let’s get a reference instead of a value:
int work(int *left, int *right) {
   return *left + *right;
}
While we pass addresses around, nothing really changes. However, when we dereference to get the value out of the memory address, we must use a load instruction.
.section .text
.global work
work:
   # int *left is in a0
   # int *right is in a1
   # Use lw to dereference both left and right
   lw a0, (a0)
   lw a1, (a1)
   # Now, add them together
   add a0, a0, a1
   ret
Whatever we leave in the a0 register is what is returned. That’s why our ABI calls the a0 register the “function arguments / return value”.
Structures
A structure is just multiple data in contiguous memory. The hard part comes from the fact that the C compiler will try to make memory accesses as efficient as possible by aligning data structures to their sizes. I will show this below.
struct SomeStruct {
   int a;
   int b;
   int c;
};
Above, when we allocate memory for SomeStruct, we need 12 bytes (one integer is 4 bytes). In memory, bytes 0, 1, 2, 3 are taken by a, 4, 5, 6, 7 are taken by b, and 8, 9, 10, 11 are taken by c. So, in assembly, we can just look at the offsets 0, 4, and 8 and use lw (load word) to load from this structure.
So, let’s use this structure to see what it looks like in assembly.
.section .text
.global work
work:
   # s->a is 0(a0)
   # s->b is 4(a0)
   # s->c is 8(a0)
   lw t0, 0(a0)  # s->a
   lw t1, 4(a0)  # s->b
   lw t2, 8(a0)  # s->c
   mul t1, t1, t2
   add a0, t0, t1
   ret
The a0 register stores the memory address where the structure starts. Then, we calculate offsets for each one of the elements a, b, and c. However, this is an easy example. There are two other examples we must explore: (1) heterogeneous data types and (2) structures in arrays.
Heterogeneous Data Types
What happens when we have multiple data types inside of a structure? The C compiler tries to make the memory controller’s work easy, so it will pad the structure so that when we access a field in a structure, it only takes one request from the memory controller. With heterogeneous data types, this means we have to waste a little bit of memory.
Take the following structure for example:
struct SomeStruct {
   char a;
   int b;
   short c;
};
The structure above has 1-byte, 4-byte, and 2-byte fields, so does that mean this structure is \(1+4+2=7\) bytes? The answer is no, the reason is padding. C will pad each element so that the \(\text{offset}\%\text{size}=0\). That is, when we look at the offset of the element, it must be evenly divisible by the size of the field.
When I teach my students, I have them draw a name, offset, size table (NOS table). In here, we can see what’s going on, and it makes it easy to translate into assembly.
Name
Offset
Size
char a
0
1
int b
4
4
short c
8
2
We can see with the table above that int b starts at offset 4. So what happened to bytes 1, 2, and 3? Those are wasted in the form of padding. So, now we can figure out the offset of each element, so the following is now translatable:
We saw that with three integers in a structure, we had offsets 0, 4, and 8. Well, lookie here! They are the same. The only thing we need to change is how we load. We look at the size column. Recall that 1 byte is a byte (lb/sb), 4 bytes is a word (lw/sw) and 2 bytes is a halfword (lh/sh).
.section .text
.global work
work:
   lb t0, 0(a0)  # s->a
   lw t1, 4(a0)  # s->b
   lh t2, 8(a0)  # s->c
   mul t1, t1, t2
   add a0, t1, t0
   ret
Structures in Arrays
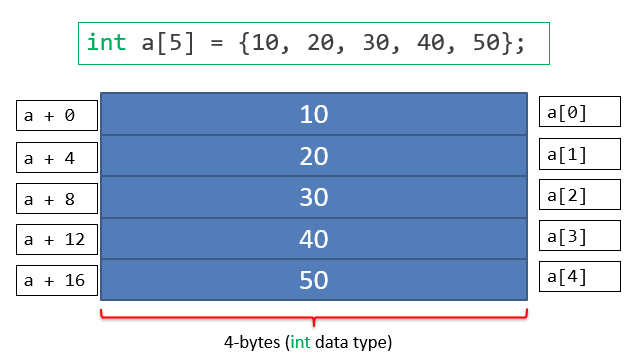
C allows any data structure to be stored in an array. An array is simply a memory address with like fields, however those like fields can be structures. The following diagram shows how an integer-only array with 5 elements would look in memory:
You can see the formula \(\text{address}=\text{base}+\text{offset}\times\text{size}\). So, if our base is a (let’s say 0 for now), then a[4] would be \(0+4\times 4=16\).
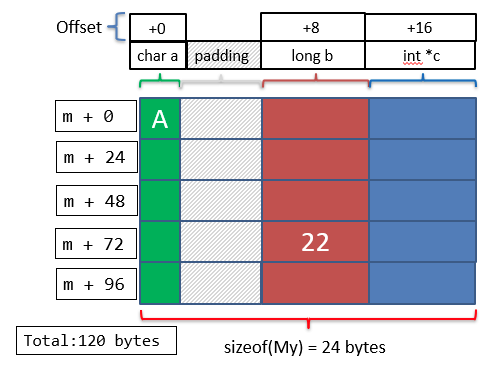
For structures, there can possibly be padding at the end of the structures. This padding is only for arrays. Remember that we need offset % size be zero. When looking for the amount of padding at the end of the structure, we take the remaining offset and % by the largest field. We pad until this is zero.
Let’s see how a structure would look in memory.
struct My {
	char a;
	long b;
	int *c;
};
struct My m[5];
m[0].a = 'A';
m[3].b = 22;
We have an array of five of these structures. Each element has fields a, b, and c. Below is a diagram of what our memory looks like:
Globals
Recall that C generally uses the stack for local variables. However, C allows for global variables. Globals are stored in one of three sections: .rodata, .data, or .bss. The .rodata (read only data) stores global constants, the .data stores global, initialized variables, and the .bss stores global, uninitialized variables or global variables initialized to 0.
The BSS section is the weirdest one here. This section is automatically cleared to 0 by the operating system. So, any uninitialized variable actually has a defined value–0.
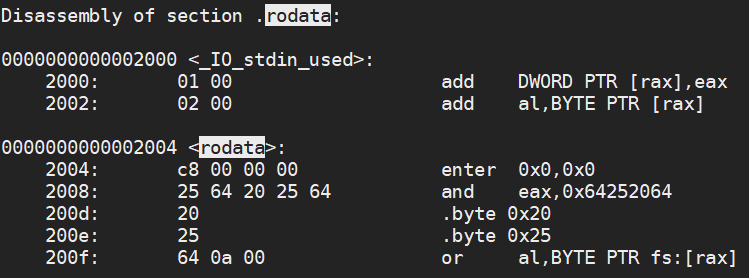
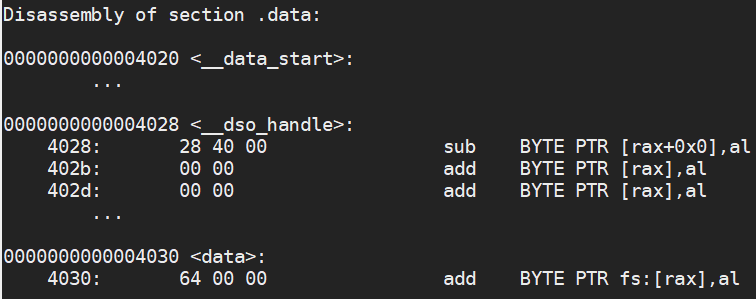
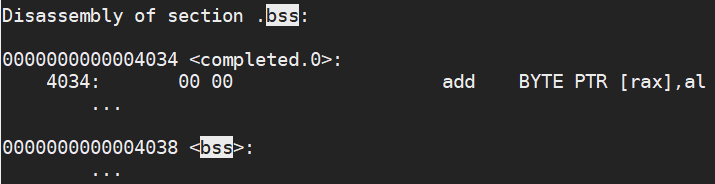
We can see these sections in action by looking at a C example:
#include <stdio.h>
int data = 100;
const int rodata = 200;
int bss;
int main() {
   printf("%d %d %d\n", data, rodata, bss);
   return 0;
}
If we look at what this produces, we see the following:
We can see that our rodata constant has the memory address of 0x2004 and has the value 0x00_00_00_c8 which is 200, our data variable has the memory address 0x4030 and has the value 0x00_00_64 which is 100. Finally our bss variable is stored at memory address 0x4038 and will have the value 0. The section only stores where the variable is located, not what is in it. The operating system itself will look at this section and assign all variables the value 0.
Conditions and Loops
Conditions are made by using a branch instruction. Some architectures support adding conditions to each instruction, but that is becoming more rare as architectures advance. Instead, we branch to a different label to either jump over code or jump into code. Let’s take a look at a for loop to see how it would look in assembly.
for (int i = 100;i >= 0;i--) {
   printf("%d\n", i);
}
The assembly equivalent would be something like the following:
.section .rodata
printf_string: "%d\n"
.section .text
.global main
main:
addi sp, sp, -16
sd s0, 0(sp)
sd ra, 8(sp)
li s0, 100 # int i = 100
1:
   blt s0, zero, 1f  # if i < 0, break the loop
   la a0, printf_string
   mv a1, s0
   call printf
   addi s0, s0, -1 # i--
   j 1b
1:
ld s0, 0(sp)
ld ra, 8(sp)
ret
So, if statements and loops conditionally execute code by using a branch instruction. In RISC-V, our branch instruction compares two registers. If those registers meet the condition, we go to the label (1f = label 1 forward, 1b = label 1 backwards). If the registers don’t meet the condition, the instruction has no effect and we move to the next instruction.
Data Types
The purpose of data types in C (when considering assembly) is to make sure we choose the correct load/store size (byte, halfword, word, and doubleword), however we also need to choose the correct operations. Most unsigned integers will zero-extend when a smaller data size is widened into a larger data size. For example:
unsigned char a = 100;
unsigned int b = (unsigned int)a;
The variable ‘a’ is only 8 bits, however it will widen to 32 bits. There are two ways we can widen a small data size into a larger data size. We can zero extend, by occupying the newly allocated space with zeroes. Or, we can sign extend, by taking the sign bit and replicating it over the new space. The choice depends on the data size. However, in assembly, it actually requires a different instruction. For example:
lb t0, 0(sp)
lbu t1, 0(sp)
The ‘lb’ (load byte) instruction will sign extend an 8-bit value in sp + 0 into a 64-bit register t0. The ‘lbu’ (load byte unsigned) instruction will zero extend an 8-bit value in sp + 0 into a 64-bit register t1. In RISC-V, we’re always dealing with a 64-bit register. C will make the distinction when emitting instructions between char, short, int, and longs.
Another occasion becomes what to do with a right shift (>>). There are actually two right shifts–logical and arithmetic. A logical right shift is used for unsigned data types and zeroes are inserted in the most significant digits place whenever bits are shifted right. An arithmetic right shift is used for signed data types and the sign bit is duplicated every time we shift right.
unsigned int a = 64;
int b = -64;

a = a >> 1;
b = b >> 1;
The variable ‘a’ above will be logically right shifted one place, which will give us 32. The variable ‘b’ will be arithmetically right shifted one place. If we did a logical shift, this would turn into a positive number. Since we duplicated the sign bit, ‘b’ becomes -32.
li t0, 64
li t1, -64
srli t0, t0, 1
srai t1, t1, 1
Conclusion and Further Reading
All in all, the compiler, when emitting its assembly code, must make these decisions. One data type of note is char. The standard does not 100% state whether we should sign extend or zero extend a char. In fact, I noticed a difference between GNU’s RISC-V toolchain vs GNU’s Intel/AMD toolchain. The former will sign extend, whereas the latter zero extends.
To see what a compiler is doing, it helps to look at the assembly code. GNU Binutils has objdump that can disassemble machine code back into assembly code. However, there may come a time where we look at the C code to see what a certain language’s compiler is doing. Who knows?
I was pretty light on the specifics when it comes to compiling. I recommend my colleague and friend’s blog about compilers here: http://austinhenley.com/
Rust now supports RISC-V out-of-the-box! This makes it much easier for us to build without needing a toolchain. If you still want to build your own toolchain, the old tutorial is at ch0.old.html
Rust will need a few things, which you can add using the rustup command. If you don’t have rustup, you can download it at https://www.rust-lang.org/tools/install.
rustup default nightly
rustup target add riscv64-unknown-none-elf
cargo install cargo-binutils
Since I use language features (denoted by #![features]), we must use the nightly builds even though RISC-V is on the stable build.
Building
Take a look at the blog git repository at: Github. You will see a file called .cargo/config. You can edit this to match your system.
The configuration file shows what target we’re building for, which is the riscv64gc target. We also need to specify our linker script so that we put things in the right location, which is in src/lds/virt.lds. Finally, a “runner” is invoked when we type cargo run, which will run the riscv64 qemu. Also, notice that there is a space after -kernel. This is because cargo will automatically specify the executable, whose name is configured through Cargo.toml.
Finished!
That’s the boring part, and assuming everything went well (it does on ArchLinux!), now to the fun parts!